टैली प्राइम स्टार्ट करना | Start Tally Prime
सॉफ्टवेयर इंस्टॉल करने के बाद डेस्कटॉप स्क्रीन से Tally Prime आइकन पर क्लिक करके टैली स्टार्ट करें तथा “Continue In Educational Mode” ऑप्शन पर क्लिक करके आगे बढ़ें।
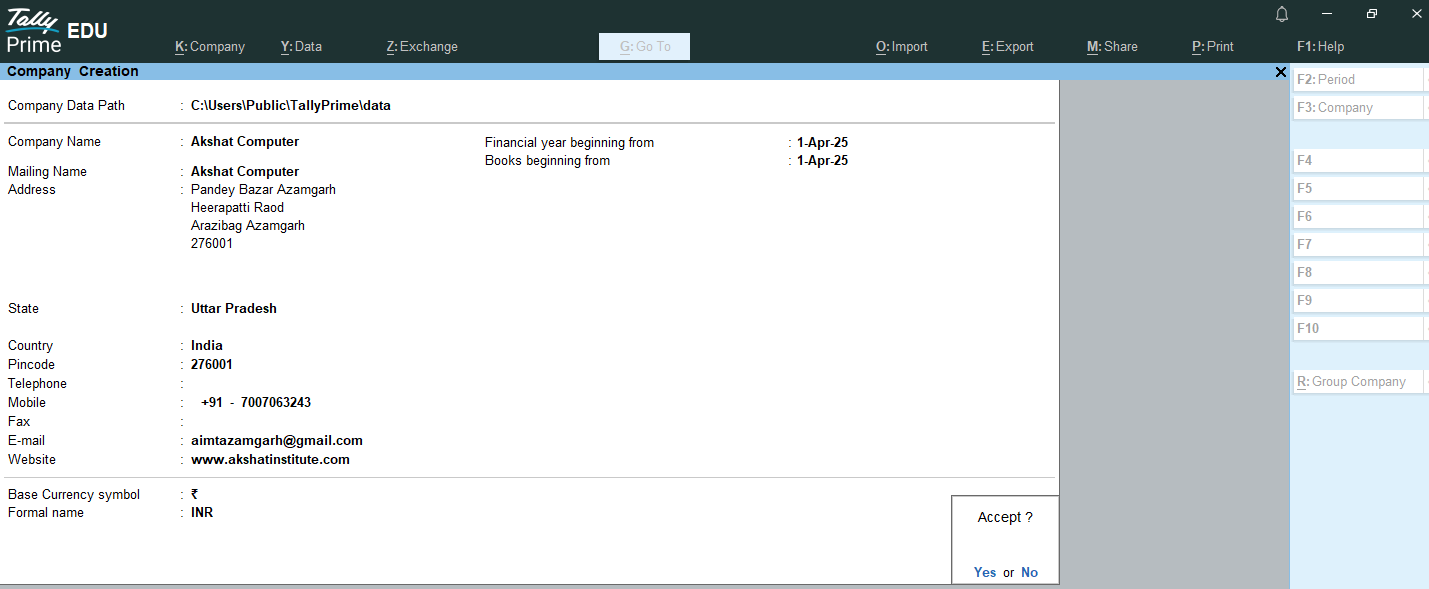
अब नई कंपनी बनाने का विकल्प दिखाई देगा, जिसे सिलेक्ट करे। इसके बाद नई कंपनी से संबंधित एक फॉर्म खुलेगा, जिसमे कंपनी से संबंधित जानकारियाँ दर्ज करनी होंगी। ये जानकारियाँ निम्न प्रकार से भरनी होंगी
After installing the software, start Tally by clicking on the Tally Prime icon on the desktop screen and proceed by clicking on the “Continue In Educational Mode” option.
Now, the option to create a new company will appear; select it. A form related to the new company will then open, where you will need to enter the company’s details. These details should be filled in as follows:
- Company Data Path:कंपनी डाटा कंप्यूटर में जिस लोकेशन पर स्टोर होगा, उसका पाथ हम यहाँ देंगे। इसे डिफ़ॉल्ट ही सेट रहने दें।
We will provide the path here to the location where the company data will be stored on the computer. Leave this set to the default setting.
- Company Name:यहाँ कंपनी का नाम टाइप करेंगे।
Type the company name here.
- Mailing Name:यहाँ उपर दिया कंपनी का नाम अपने आप आ जाता है। वैसे इस फील्ड मे कंपनी का पूरा नाम दिया जाता है।
The company name shown above is automatically populated. However, the full company name is typically entered in this field.
- Address:कंपनी का पता यहाँ टाइप करें।
Type the company address here.
- State:कंपनी राज्य (State) सिलेक्ट करें।
Select the company’s state.
- Country:देशों की सूची से India को सिलेक्ट करें।
Select India from the list of countries.
- Pin Code:कंपनी का पिन कोड दर्ज करें।
Enter the company’s PIN code.
- Telephone: कंपनी का टेलीफोन नंबर दर्ज करें।
Enter the company’s telephone number.
- Mobile No:कंपनी का मोबाईल नंबर दर्ज करे।
Enter the company’s mobile number.
- Fax No: यहाँ कंपनी का फैक्स नंबर दर्ज करें, यदि है।
Enter the company’s fax number here, if available.
- E- Mail:यहाँ कंपनी का ई-मेल दर्ज करें।
Enter the company’s email address here.
- Website:कंपनी कि वेबसाइट दर्ज करें।
Enter the company’s website.
- Financial Year Beginning From:कंपनी का वित्तीय वर्ष दर्ज करें, वित्तीय वर्ष (Financial Year) 1 अप्रैल से शुरू होता है, वर्ष कोई भी हो सकता है। जैसे – 1 अप्रैल
Enter the company’s financial year. The financial year starts on April 1st, and the year can be any year. For example, April 1, 2025.
- Books Beginning From:यहाँ वित्तीय वर्ष की तारीख अपने आप आ जाती है, इसमे वह तारीख दर्ज करें जिस तारीख से कंपनी का लेखा-जोखा शुरू हो रहा है।
The financial year date is automatically generated here; enter the date from which the company’s accounting records begin.
नोट – कुछ अन्य सेटिंग्स जो डिफ़ॉल्ट रूप से बंद (Disable) रहती हैं, आवश्यकता अनुसार इन्हे F12 बटन प्रेस करके चालू (Yes) किया जा सकता है। ये सेटिंग्स हैं; Contact Details, TallyVault Password, User Access Control, Base Currency Details.
Some other settings, which are disabled by default, can be enabled as needed by pressing the F12 button. These settings include: Contact Details, TallyVault Password, User Access Control, and Base Currency Details.
- Set TallyVault Password to encrypt Company Data:ये फीचर TallyVault कंपनी के लिए एक सिक्योरिटी फीचर है, जो कंपनी के डेटा की सुरक्षा के लिए दर्ज किया जाता है। यह एन्क्रिप्टेड फॉर्म मे होता है, इस पासवर्ड के बिना कंपनी को एक्सेस नही किया जा सकता।
This feature is a security feature for TallyVault, designed to protect the company’s data. It is in an encrypted form, and the company’s data cannot be accessed without this password.
- Control User Access to Company Data:टैली में कई सिक्योरिटी कंट्रोल है, जो विभिन्न युजर की अथॉरिटी को डिफाइन करते है। इसमें डेटा को एक्सेस करना, डेटा फ़ीड करना, बदलाव करना या डिलीट करना आदि शामिल है। Yes या No करके इस फीचर को एक्सेस कर सकते हैं।
Tally has several security controls that define the authority of different users. This includes accessing, entering, modifying, or deleting data. This feature can be enabled or disabled with a simple Yes or No option.
- Base Currency Information:इसमें करंसी से संबंधीत विभिन्न् जानकारी होती है; जैसे- Currency Symbol, Formal Name, Decimal Places आदि। इसे डिफ़ॉल्ट रहने दे, क्योंकि यह जानकारी भारत (India) के अनुसार सेट होती है।
This section contains various currency-related information, such as the currency symbol, formal name, and decimal places. Leave it as the default setting, as this information is already configured for India.
अब Company Creation फॉर्म को Enter प्रेस करके Accept कर लें। इस तरह से कंपनी सक्सेसफुली (Successfully) क्रीऐट हो जाएगी।
Now, accept the Company Creation form by pressing Enter. This way, the company will be created successfully.
नोट – कंपनी सक्सेसफुली क्रीऐट हो जाने के बाद कंपनी के फीचर्स से संबंधित एक विंडो ओपन होगी, इसमे कंपनी के फीचर्स को आवश्यकता अनुसार चालू (Yes) या बंद (No) कर सकते है। इसे निम्न प्रकार सेट करें
After the company is successfully created, a window related to the company’s features will open. In this window, you can enable (Yes) or disable (No) the company’s features as needed. Set it as follows:
- Show More Features:अधिक फीचर्स को दिखाने के लिए इसे Yes सेट करें।
Set this to Yes to display more features.
- Show all Features:सभी फीचर्स को दिखाने के लिए Yes सेट करें।
Set to Yes to display all features.
- Maintain Accounts:Yes सेट करें। Set to Yes.
- Enable Bill-wise entry: Yes सेट करें। Set to Yes.
- Maintain Inventory:Yes सेट करें। Set to Yes.
- Integrate Accounts with Inventory:Yes सेट करें। Set to Yes.
- Enable Goods and Services Tax (GST): यह फीचर डिफ़ॉल्ट रूप से Yes रहता है, इसे No सेट कर दें, ऐसा इसलिए क्योंकि इसे तब Yes करेंगे जब GST टॉपिक शुरू करेंगे।
This feature is set to Yes by default; please set it to No, as we will only set it to Yes when we start the GST topic.
बाकी अन्य सेटिंग्स को No ही रहने दे अब सभी फील्ड्स सेट करने के बाद Enter बटन प्रेस करके विंडो Accept कर लें। इसके बाद Gateway of Tally विंडो ओपन होगी जो निम्न प्रकार दिखेगी।
Leave the remaining settings as “No”. After setting all the fields, press the Enter button to accept the window. The Gateway of Tally window will then open, which will look like this:
